Running an OS in the BIOS
Recently I saw a video about flashing coreboot onto a Thinkpad without requiring any custom rom flasher. This interested me because I was always interested in running coreboot on my laptop and I hadn’t gotten around to buying a custom flasher or attempting it myself.
Setup
In order to get this to work, their was 2 pieces of software that I would need to use and maybe a bit of hope that I didn’t brick anything.
1vyrain is itself a sort of custom bios which offers some options not offered by the default bios of a certain age of Thinkpad. There are some benefits to using it but I was mainly interested in its ability to load custom payloads which would allow me to load coreboot.
skulls on the other hand is essentially a pre-built coreboot payload but there are some niceities in the repo that made it easier to do what I was trying to do.
The Thinkpad that I would be using to test this on is an X230 that I’ve had since college and it doesnt get as much use now that I have some newer computer toys to play with, but considering I always wanted to be able to run coreboot/libreboot this seemed like a good place to start testing the waters of what was possible.
Hardware vs Software Flashing
With hardware flashing, a programmer is attached to the physical rom chip on the motherboard of the computer so that you can completely erase and re-write the bytes that are there. There’s no limit to what you can do, which has its own pro’s and con’s but I would generally think that its easier to recover from a bad state.
However
With software flashing, you don’t need any specialized tools and its all just happening in the software. The specific details are something I’m not too familiar with but I would assume that there is a pathway in the code that allows this to happen given certain criteria are met. For Example: by using 1vyrain to prep my BIOS for payloads before an OS is even run, I am able to flash that location in memory and then create a pathway for further updates to occur.
Getting Skulls to Run
By following all the steps in the 1vyrain readme, you will eventually get to a step where it mentions custom binaries. At this point, I loaded my skulls image (specifically the “top” rom) by having it on another computer running python -m http.server. By doing that I could easily wget the image without having any secure connection. (I also hashed the results and made sure it matched the expected, It would not be great to flash a corrupted image into your bios and then not be able to recover)
With the skulls bios top rom payload flashed, and the system fully rebooted, skulls was installed and I had a coreboot laptop!
- Note: there are still non-free parts running and I didn’t clean out the Intel ME due to reports that it would slow down boot a good amount. For me this was good enough as I figured I could always go back and properly run me cleaner if I ever get around to buying a rom flasher.
- I did use the freevga bios but then decided to go to the nonfreevga bios just so it would take up the full screen but honestly its still an awkward resolution that I don’t think it matters too much.
Coreboot/Skulls
It is awesome to see how quick a computer can boot when you strip its bios down to the bare necessities and I would definitely say that I accomplished that. Realistically this is how this laptop will now be used from now on. I occasionally check the skulls repo to see if there are any new updates as skulls has a really nice way of updating with a shell script if necessary.
But the cool part was now that I had cracked open what was possible I could get to a fun idea I had. Running a full OS in the bios of my computer.
KolibriOS
KolibriOS is an extremely small os which is what I was looking for. In the top rom of the X230, I have 4MB to play around with and I still wanted to keep my functioning SeaBIOS to GRUB payload setup so that I can still boot into linux.
Some other cool things about Kolibri: - Written in ASM - Lightweight (Barely any RAM needed) - Has a TCP/IP stack
But its important to note, in the way that I was going to be running this, I didn’t really know what would work or what wouldn’t. The main purpose of this was the exploration of what is possible.
Creating a new Skulls/Coreboot Image
In order to create a skulls image with a custom kolibrios image within it I had to first build the coreboot payload, inject the os image, and then cut it off to 4MB to ensure that it would fit in the top rom of my x230. The top rom is the only part that is flashable so I needed to make sure that even after cutting the coreboot image down, it would still fit the os inside of it.
These are the steps I did:
- Install any prerequisites or install them as the error out, I used arch on my x230 so latest versions were typically available
git clone https://github.com/merge/skulls.git && cd skullsgit checkout 1.1.3(use whatever the latest release is)cd x230(use the Laptop Model that is supported)./build.sh -c nonfree-defconfig-4931b978d9(file may change based on version)- This can take some time as its building coreboot
cd build./build/cbfstool build/coreboot.rom print- This is just to make sure that everything’s working
curl https://builds.kolibrios.org/en_US/latest-img.7z -o latest-img.7z && 7z e latest-img.7z./build/cbfstool build/coreboot.rom add -f kolibri.img -c lzma -n floppyimg/Kolibri.lzma -t raw- This adds the kolibri image to the coreboot image
./build/cbfstool build/coreboot.rom print- Run this again to make sure its there, total up the sizes to make sure everything up to and including the floppyimg/Kolibri.lzma is less than 4MB
- Mine totaled out to about 2MB
dd if=build/coreboot.rom of=coreboot-kolibrios.rom bs=1M skip=8- There should now be a file in the same directory that is exactly 4.0M as reported by
ls -lh
- There should now be a file in the same directory that is exactly 4.0M as reported by
cp coreboot-kolibrios.rom ../.. && cd ../.. && sha256sum coreboot-kolibrios.rom > coreboot-kolibrios.rom.sha256- Copying the file to root of skulls dir and generating sha256sum for flashing verification
- In
/etc/default/grubfind the lineGRUB_CMDLINE_LINUX_DEFAULT="..."and inside the quotes, appendiomem=relaxedto the end- run
sudo update-gruborsudo grub-mkconfig -o /boot/grub/grub.cfg
- run
- NOW TIME FOR FLASHING
sudo ./skulls.sh -b x230 -i coreboot-kolibrios.rom- When it asks to Flash the BIOS now, hit y then enter, then when it asks to poweroff hit y then enther
- Then power on!
Screenshots
Back to Skulls
To get back to regular skulls the process is much easier as you can just use the release of skulls and flash the regular image provided.
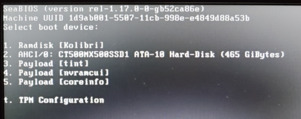
- Press Escape when booting up and then select your drive to get back into linux
wget https://github.com/merge/skulls/releases/download/1.1.3/skulls-1.1.3.tar.xz && tar -xvf skulls-1.1.3.tar.xz && cd skulls-1.1.3sudo ./skulls.sh -b x230- Select the nonfree bios for similar behavior
- Y to flash, then Y to shutdown
- On next boot you should not boot into kolibrios by default and GRUB should come up!
What worked and didn’t work with Kolibri in the BIOS
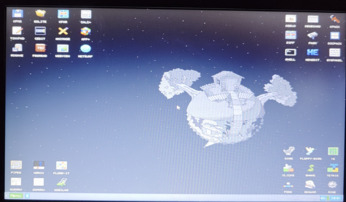
The network drivers weren’t installed so unfortunately no network connections but all the builtin applications for the most part should work. I did have a crash here and there which required me to reboot but nothing too crazy. The games worked, too which is always cool, who doesn’t want to play dino in a ramdisk started from an OS hosted in the BIOS.
I just think its awesome that I can essentially have an OS completely inside the BIOS section of my Laptop’s ROM!
Would I recommend this… Not really. If you want to play with OS’s its easier to just do it in VMs or with qemu and its a lot easier to adjust as needed. I for instance could not figure out how to get my Drive to be 1st in the payload order but I didn’t look too hard because I didn’t think I would keep this as a permanent thing.
That’s all for this post, I hope you enjoyed reading!